Friday, June 29, 2018

HOW TO RESET TP LINK ROUTER?

TP link is a huge name in the networking industry. From wired and wireless routers, range extenders, antenna , modem and much more , it has a diversity in its range of products. From office to our homes and from hospitals to departmental stores everybody is using wireless technology for the best of its use. TP link  is a regular commodity and most preferred internet router for its ease to use and affordable prices. If you want to reset your router, the process is very simple. You could either perform a hard reset which will clear all your previous settings or using the router’s web based interface. This process is much simpler than you would have thought. However all your settings will be erased after this act. There are two ways to reset a router.


There are two ways to reset the router;
  • Hard reset
  • Using the web based interface
Steps To Reset  TP LINK ROUTER using Factory reset data


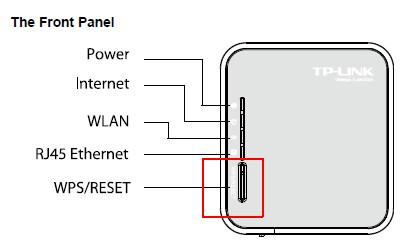
  • Spot the reset button behind the router
  • Insert a paperclip or any similar thing into the pinhole and hold the reset button for ten seconds.( 30 seconds for old router)

Steps To Reset  TP LINK ROUTER using the web based interface  ;


  • Connect the router to your computer using an ethernet cable.The LAN port of  router and the ethernet port of your computer should be connected via single ethernet cable.The adsl cable of modem goes inside the wan part of router.
  • Open your web browser and type in IP address of your router to access the web based interface. You can either type tplinklogin.net or enter the default IP address i.e 192.168.1.1 and press enter.
  • A login screen asking for your username and password will open in front of you. The default username and password in this case will be “admin”.
  • After logging in, you will directed to the setup page.
  • On the setup page under the left hand side navigation panel, click on system tools and choose “Backup and restore” and wait for the router to reboot and acquire its settings.
  • Click on “restore” and tap OK.
  • Your router’s configuration will be loaded. Now reboot your router to enjoy hassle free browsing with your router.


Facing technical woes with your router. Contact tp link technical support for avail the best technical assistance for your router.

Routers are easy to access but sometimes they have their own level of complications which cannot be treated without proper technical assistance. If your router fails you or if you face complexities while dealing with your router very often, you should instantly contact tp link technical support. Keeping in view that these complications can happen at any time of day or night, we have kept our service available for our customers 24*7 hours. So even if you are stuck with your router in the middle of the night, you can avail the finest technical assistance for your router at TP link technical support. Our team members expertise in dealing wit all the complications a router can haver and provide instant solutions. You can also live chat with our experts through tp link live chat support where our executives will communicate live with you throug chat rooms. So why waste your time and money when you can easily avail technical assistance at neglible and affordable  cost. Our team focuses on providing efficent solutions and complete guidance until your query is solved.

Monday, June 11, 2018

How to configure arris sb6190? - Arris Router Technical Support

Arris is one of the most rapidly growing router brand in the market. Thousands of people all across the globe buy these routers to get access to high-speed internet connectivity and also to share the same with multiple other devices. The most important part of buying a router or modem device is to configure it and set it up. Just buying a device and plugging it into the power source won’t make it work. So in this article, I will discuss a detailed method to configure the Arris sb6190 modem. Make sure to follow the instructions carefully. In case you do not understand any part or need technical help for any other issue related to your Arris device then you may contact our Arris Router Technical Support for some of the finest technical help from experienced network engineers.


Configuration and Setup of Arris sb6190:
Setting up your Arris sb6910 modem is simple and can be done by anyone by following a few simple steps. I will discuss in detail how you can configure and setup your Arris sb6190 with ease. So make sure to follow the instructions carefully.
  1. Connect the coaxial ADSL cable from your wall outlet to your Modem, and then use an ethernet cable to connect it to your computer. One end goes into the LAN port while the other end goes inside the computer. Power on both your devices and wait a few seconds to let the connection get established.
  2. Look at the bottom of your device, you will notice an address starting with https…, this is the configuration portal address.
  3. Open your web browser and type in this address into the URL field and hit Enter, you will be redirected to the login page for the configuration of your Arris modem.
  4. Look under your device for any default login details, in case if you find any, then use it to log in, otherwise, you can also use the default credentials if you cannot find any details at the bottom.
    Username: admin
    Password: password.
  5. You will be redirected to the configuration page for your Arris sb6910 modem. You need to select whether you want to use this modem in conjunction with the cabled internet connection or wirelessly. Check the box as per your internet connection and save the settings.
  6. You have successfully configured your Arris sb6910 modem and now you can use it for getting access to high-speed internet connection and also share the same with multiple other devices.

These are some of the steps one needs to follow in order to configure and set up their Arris sb6910 modem device. Hopefully, these steps will help you in resolving the issue. In case you have any doubts or queries regarding these steps, or if you were not able to resolve the issue, then feel free to contact the Arris Router Technical Support for complete solutions. Our services are available for 24*7 round the clock and 365 days throughout the year.


Contact Arris Router Technical Support for Efficient Services every time:
Arris Router Technical Support is an online technical services provider with more than 5 years of experience in helping and making life easier for different Arris device users. We as a service provider understands that electronic devices like routers and modems are unpredictable and might falter without any prior warnings. This is the reason we have made our services available for 24*7 round the clock and 365 days throughout the year. Our services are renowned for its efficiency and reliability and the set of technicians we possess are highly qualified professionals. These network engineers have seen the change in technology over the years, and thus capable of resolving any degree of complexity with your Arris device dynamically. So do not waste your precious time and money looking for a technician around, when you can avail the services of some of the finest with just a phone call to our toll-free Arris router technical support number.

Tenda router not connecting to mobile - Help Tenda Router Support

Procedure for connecting mobile to Tenda router’s Wi-Fi network -
Note - Make sure you have setup Tenda router properly.
1. For connecting Android device to the wireless network, first of all, press the Home button and then Apps button.
2. In next step, navigate to Settings and then move to “Wireless and Network” section. After that, turn on WiFi.
3. Wait for a few moments until your device get connected to Tenda router’s WiFi network. If you didn’t find Tenda router’s network then rescan for the available network. Well, such condition may arise if SSID is hidden.
4. If you find Tenda router’s network then connect to it manually. If the network is not secured then you will easily get connected to the network otherwise you may have to enter the passphrase.
5. After entering correct WiFi network password, click on Connect button.
Now, your connection to the wireless network gets complete successfully.
If your mobile successfully connected to the Tenda wireless network but still you can’t access to the internet then you should immediately discuss your problem with the network administrator. 


If your Tenda router is not connecting to mobile phones then have a look at these solutions -

1. Verify AP and Tenda router settings
First and foremost, you should start by verifying that your Tenda router is present in nearby location and actively offering wireless connectivity.

2. Check Wireless adapter -
Before going to further steps, make sure Android Wi-Fi adapter is enabled. Also confirm that your mobile phone’s WiFi radio is not in Airplane mode. So, confirm WiFi is on and ready to connect. To check this, navigate to Settings> Wireless Networks> WiFi. If WiFi is not set as “ON” then tap the slider to turn it ON. When WiFi is on, you will see signal indicator at the top right corner of screen.

3. Verify SSID and IP address -
Make sure your Android device is connected to correct SSID and IP address. Navigate to your Android device settings and then move towards Settings> Wireless and Networks> Wi-Fi panel> WiFi Settings. After that, you have to search network name in the list of nearby networks. If you does not find network name in the list then it might be possible that your router is hiding its SSID. To configure your network name manually, click on “Add Network”.

4. Check network connection with ping -
To verify network activity, use Ping only when your Android WiFi client has a valid IP address. If you can successfully open website page then Congratulations, you are successfully connected to the internet. On the other hand, if you get any error then definitely you have to make more efforts to troubleshoot wireless network issues. You can also use ping app like Fing or IP Tools to ping your router’s LAN IP.

5. Verify Radius is working -
Make sure Radius is working appropriately. Mainly, you have to check EAP types that are required by your Radius server.
a. If Radius server requires EAP-TLS then you have to set the Client’s Security field to “802.1xEAP”.
b. If Radius server requires EAP-TTLS then you have to set the client security field to “802.1xEAP”.
C. If Radius server requires any other EAP type, then you have to use Android Compatible Mobile Device Manager to configure your wireless network connection with appropriate settings.

6. Look for intermittent network connections -
If your Android device is still not connecting to WiFi network then definitely you are experiencing lower-level wireless problems. In order to facilitate debugging, you can install apps like Ookla SpeedTest, WiFi Analyzer, Fing.

If you are still unsuccessful in connecting Tenda router to mobile then don’t waste your time and get in touch with experts as soon as possible to troubleshoot all connectivity hassle. You can communicate experts at Tenda Technical Support Number and get the perfect answers.